Showing posts with label Cute Crafts. Show all posts

Monday, January 6, 2014

DIY Notebook Re-Covery

            Do you have a lot of old notebooks with plain, boring covers? Well, never fear, we have a solution to your problem! In this post, I'll show you how to create a cute, colorful cover that everyone will love.

What you need:
-1 plain notebook
- Several sheets coordinating patterned paper
-Several sheets of plain-colored paper
-Clear contact paper
-Glue stick
-Paper cutter

 Step 1:  Measure the paper that you want as your background cover, and cut it to fit your notebook. Glue down.

Step 2: Sketch your basic design on colored or patterned paper (we drew a tree and cut it out of brown paper). Next, cut out any details you want like leaves, petals, or feathers depending on your design choice.


Step 3:  Glue down all of the pieces and if you want, write a phrase or word, or add details in Sharpie. Take a piece of  contact paper, cut it so that it overlaps the top, bottom, and right sides of the notebook cover, and press it down firmly around the sides and top (if it still doesn't stick, you can fasten it down with clear plastic tape).


Thursday, November 28, 2013

Thelma Lou the Thanksgiving Turkey


How to celebrate Thanksgiving turkeys: Thelma Lou-style


What you will need:
  • Construction Paper
  • Cardboard (thin cardboard works best)
  • Scissors
  • Gluestick
  • Markers


 How to make it:
    1. First, cut a turkey shape out of the cardboard, but don't include the feathers.

    2. Cut a strip that is the same length as the base of the turkey, and  the height should be about an inch and a half. This will be the crossbeam that the turkey sits on to help it stand up.

    3. Draw a fun pattern on your turkey body and on the crossbeam strip. I used herring-bone on mine.


    4. Next, cut out a triangle for the beak and triangles for the feet, then glue them on.


    5. Draw on the eyes. You can also add a tuft of feathers on the chest.

    6. Now cut out six feathers (you can actually add more if you want) of different colors using the construction paper. Red, orange, and yellow are the traditional turkey feather colors. Glue them on the back of the turkey body.

    7. Cut a strip about an inch and a half tall up the turkey from the base, then insert the crossbeam.

    8. Add to a table for cute Thanksgiving decor!
                                         

    Wednesday, September 25, 2013

    Ooh La La! DIY Magazine Holder

    Tired of your magazines getting ripped and wrinkled? Perhaps a cute magazine holder can keep them safe and organized!

    You Will Need:
    • A large cereal box
    • Scissors
    • Tape
    • A clear plastic sleeve
    • Scrapbook Paper
    • Plain white paper
    Let's Get Started:
     1. Cut off the top of the box so that you can see the title of the magazine. You can slope it or straight-edge it
     2. Cut a rectangle down one of the sides to make it look more like a file box.
     3. Next, glue a sheet of plain paper onto the box to cover up the original face. Make sure all sides are covered.
     4. Glue the sides of the paper down on the inside for a cleaner-looking cut.
     5. Take the plastic sleeve and cut along the side to open it up. Once opened, wrap it around the front, back, and sides of the box and secure with tape. Also make sure the bottom of the sleeve is taped to the bottom of the box. Cut off the excess plastic at the top of the box, but do NOT tape the top down.
     6. Also cut plastic to fit the rectangle, but once again, do NOT tape down the top.

     7. Next, choose scrapbook paper to use on the box. I found this to be the hardest step. :)
     8. Cut the paper to fit the shape of the box (one for each side), then slide it between the plastic and the box. This ensures that the paper will remain clean and tidy, and it allows you to be able to change out the paper, too.

    9. Insert magazines and enjoy!

    Monday, July 8, 2013

    Coral Reef Island Crafts Gift Exchange

    Ever thought it would be fun to take part in a craft exchange? Coral Reef Island is hosting a Craft Gift Exchange on Elfster- no purchase necessary! Simply sign up here:

     http://www.elfster.com/exchange/view/9160292/6ec470/

    and get ready to sharpen your crafting skills! The sign-up deadline is Wednesday, July 10, and names will be drawn on July 12. We're looking forward to drawing your name!

    Tuesday, July 2, 2013

    Fourth of July Crafts


    With the Fourth just around the corner, everyone is already planning their cookouts, parties, parades, and firework watching. So to help you in freedom celebrating festivities, I'm here to show you a few simple, fun, and easy-to-do crafts to add to your red, white, and blue home decor! So let's start with a festive banner, perfect for hanging on a mantle or door. But before we begin, let me just note that I used specific colors for specific things, though you're welcome to choose whatever colors you want, and remember you can edit your supplies to suit whatever things you have at home!

    Freedom Pennant
    Supplies:
    Cardstock
    Ribbon or Twine
    Markers or Letter Stickers
    Scissors
    Hole Punch


    Instructions:
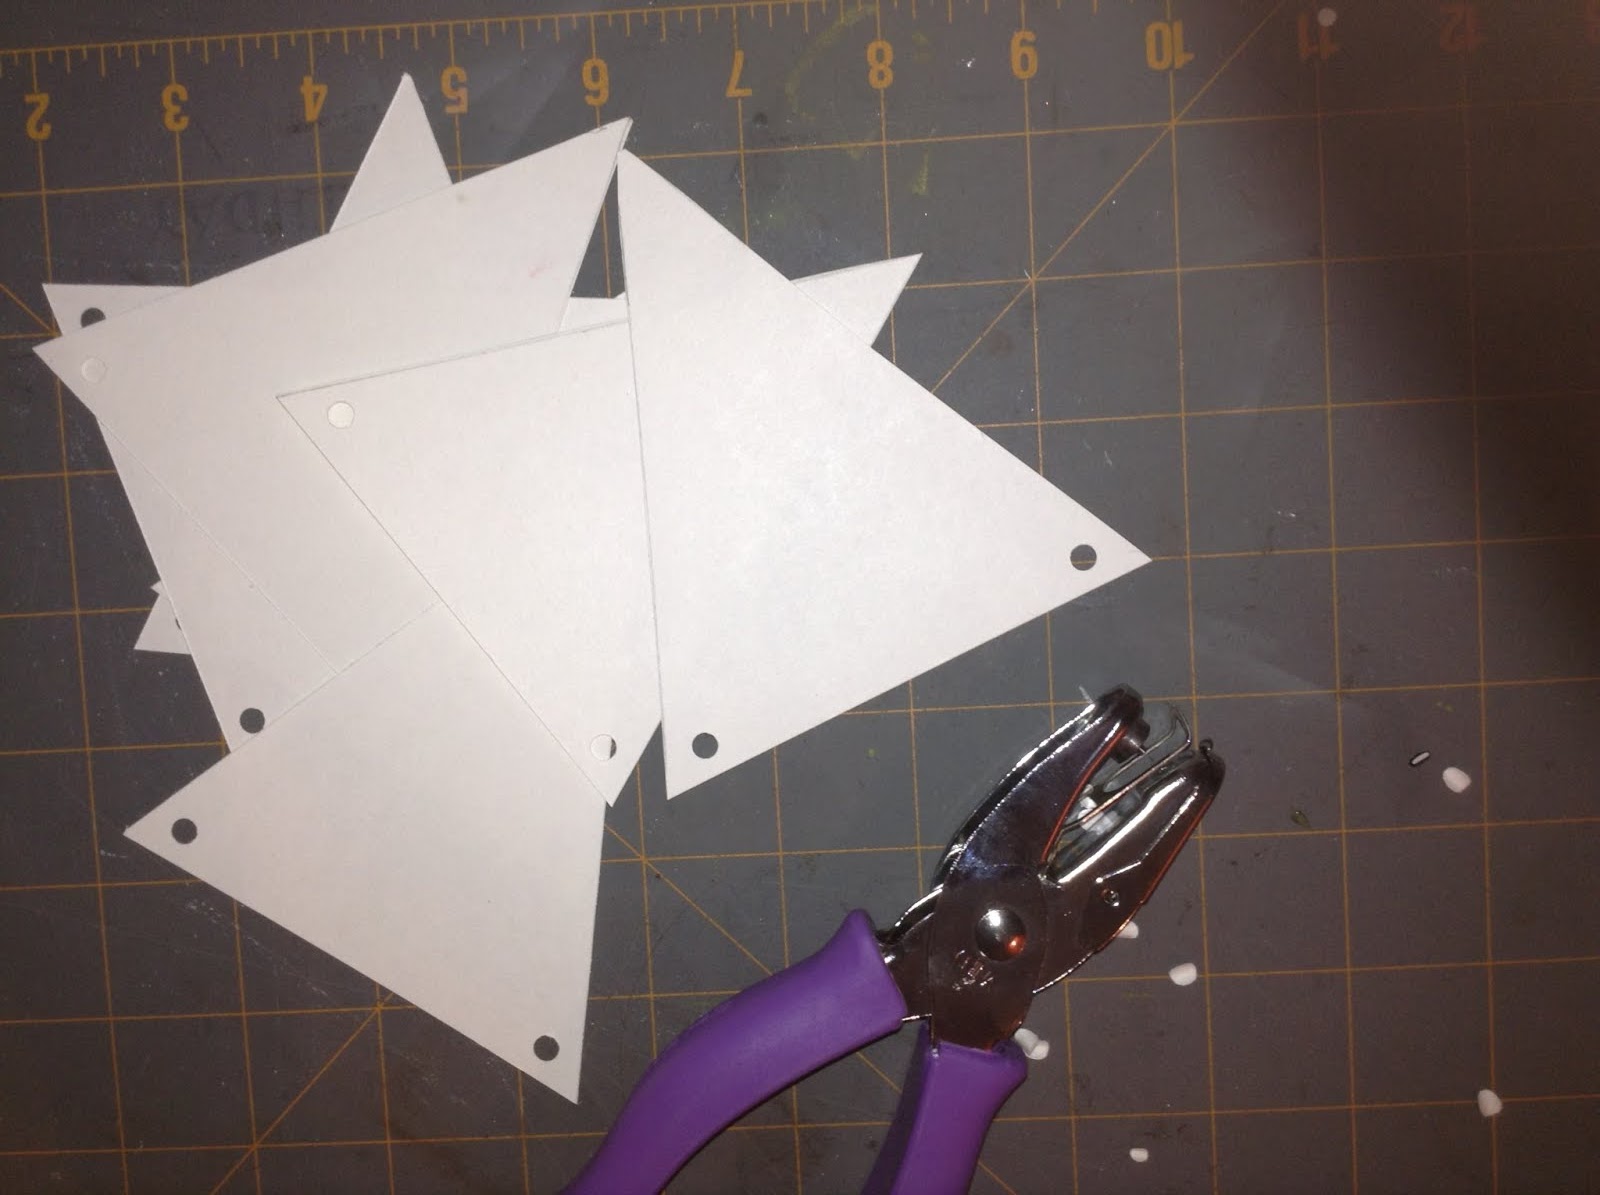
    1. Begin by using your cardstock to cut seven even isocoles triangles (Or however many needed, depending on what you want your banner to say!) A good way to ensure that all the triangles are the same size is to make one triangle then use it as a pattern and trace and cut out more.


    2. Next, punch two holes in the top corners of each of the triangles. 


    3. Now use your markers or letter stickers to write out your phrase on the banner, writing one letter on each pennant. If you have an electronic cutting machine or punches, those could definitely come in handy as well. I also added some dots around each pennant to add a little more embellishment.


    4. Finally, feed your ribbon or twine through both holes of each pennant, placing your letters in the correct order. I added little bows at the ends of mine. 


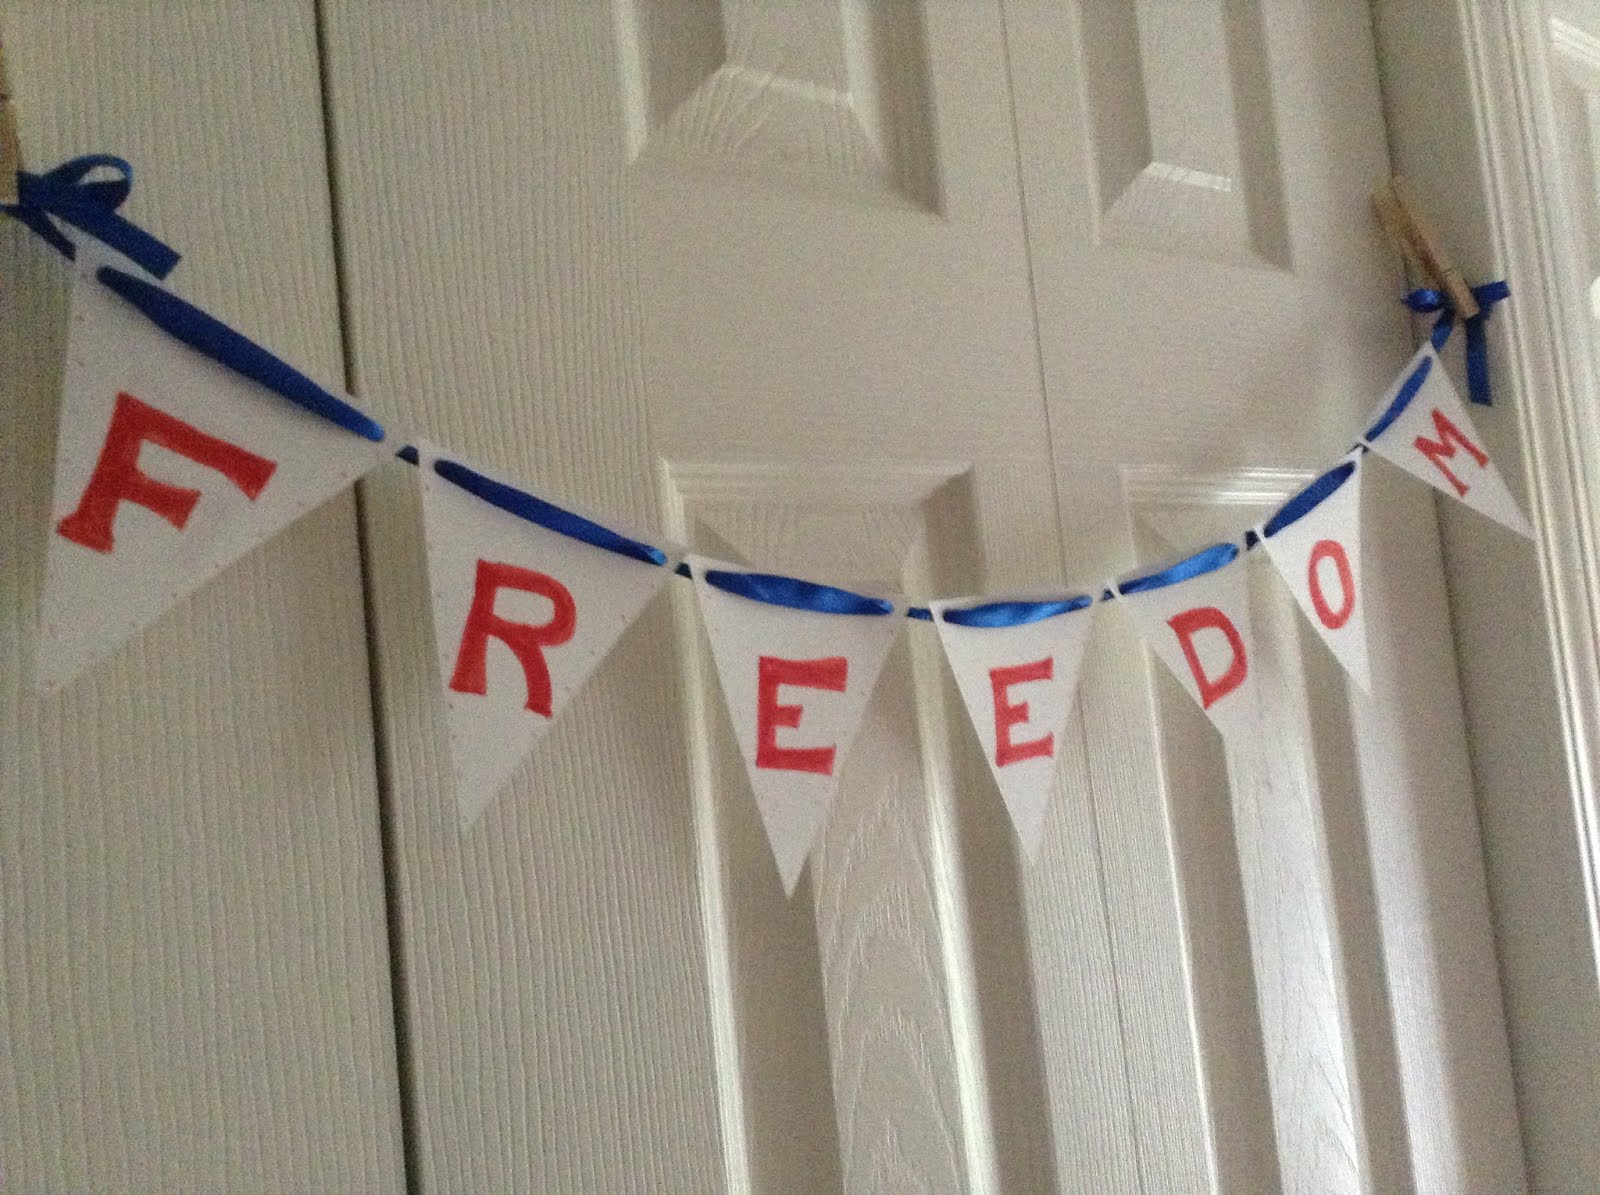
    Yay! Your very own pennant banner! Now let’s move on to another craft... this one is a little more complicated but really cool! We’re going to be making patriotic (or just everyday) pinwheels! I’ve been seeing these little cuties all over the place, but generally they’re more than you want to pay for a paper and stick decoration, and turns out they're pretty easy to make when you get the hang of it! So without further ado... here’s how to make pinwheels:


    Patriotic Pinwheels
    Supplies:
    Cardstock
    Mini wooden rods/sticks (found at craft stores) or Straws
    Markers
    Metal brads
    Scissors
    Ruler


    Instructions:
    1. Begin with cutting your cardstock (if it isn’t already) into squares. Keep in mind the size of the actual pinwheel will be about the size of the square you have to begin with.


    2. If your paper isn’t already patterned/colored, now would be the time to break out the markers! Draw any design you want on both sides of the paper, or just one! Here, I did one side only. 


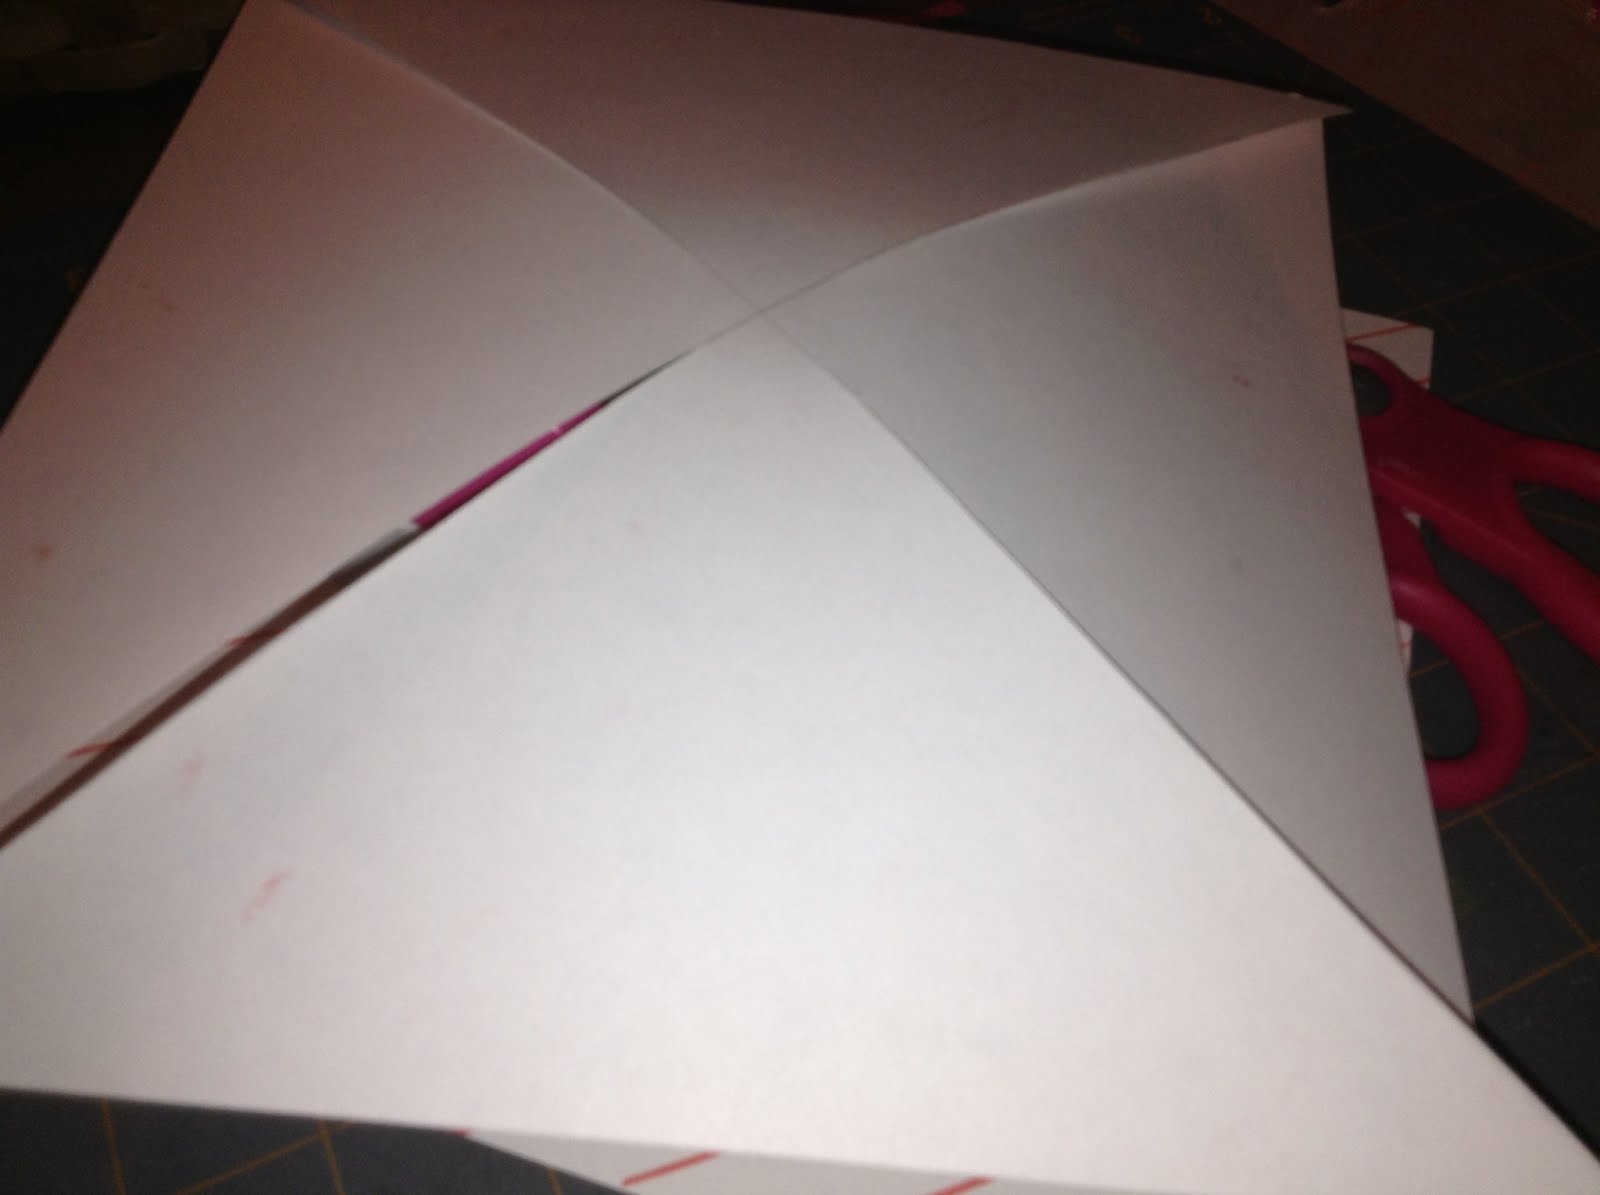
    3. Next, flip to the blank side of your cardstock (or if it’s patterned on both sides it doesn’t matter which side). Using a ruler, draw two diagonal lines from one corner to the other corner. (You can hopefully see here!)  


    4. Then, use your scissors to cut along the lines you just made. BUT DON’T CUT ALL THE WAY THROUGH. Start from the tip of the paper and cut toward the middle, but when you get close the the center, stop around an inch away from it. When you’re finished it should look like this: (Notice the middle isn't cut through!)


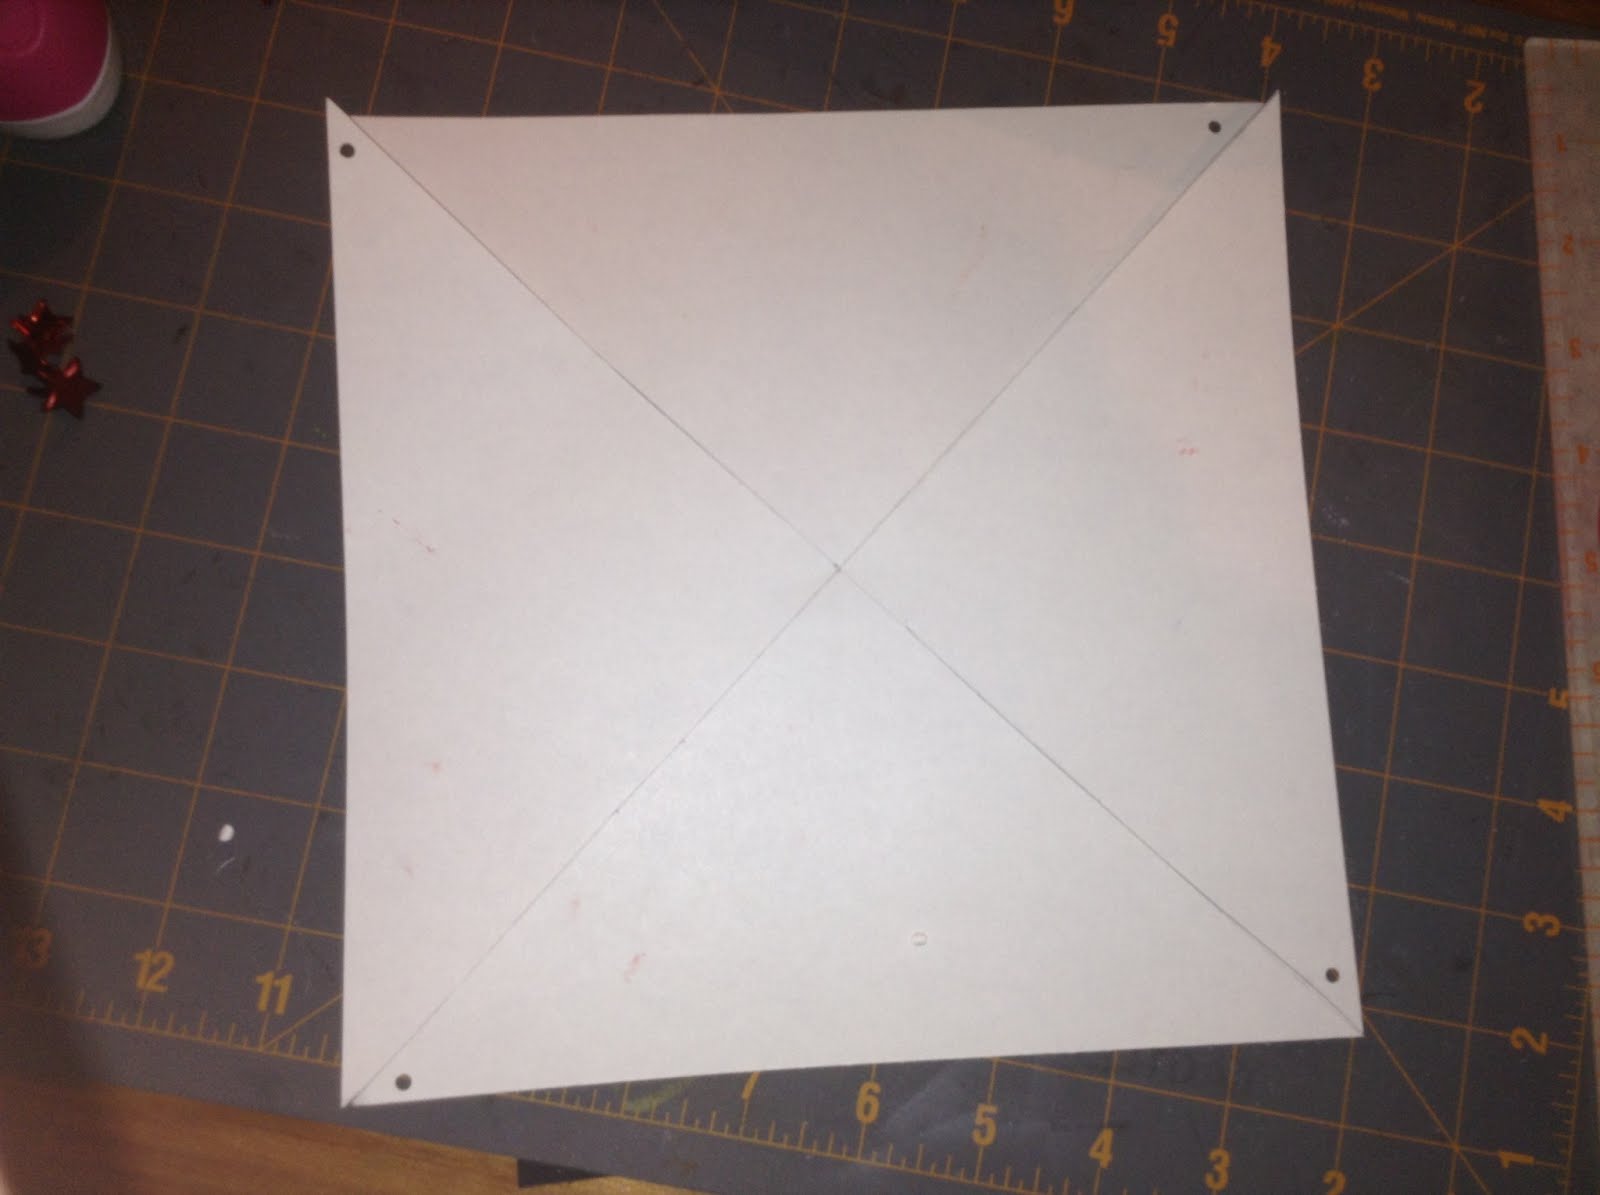
    5. Now comes some holes. You’re going to punch/poke them in five places. In the center of the paper where the two diagonal lines meet, and on each of the corners of the square. Here's what it should look like: (So make sure you don't cut two holes in one triangle shape!)


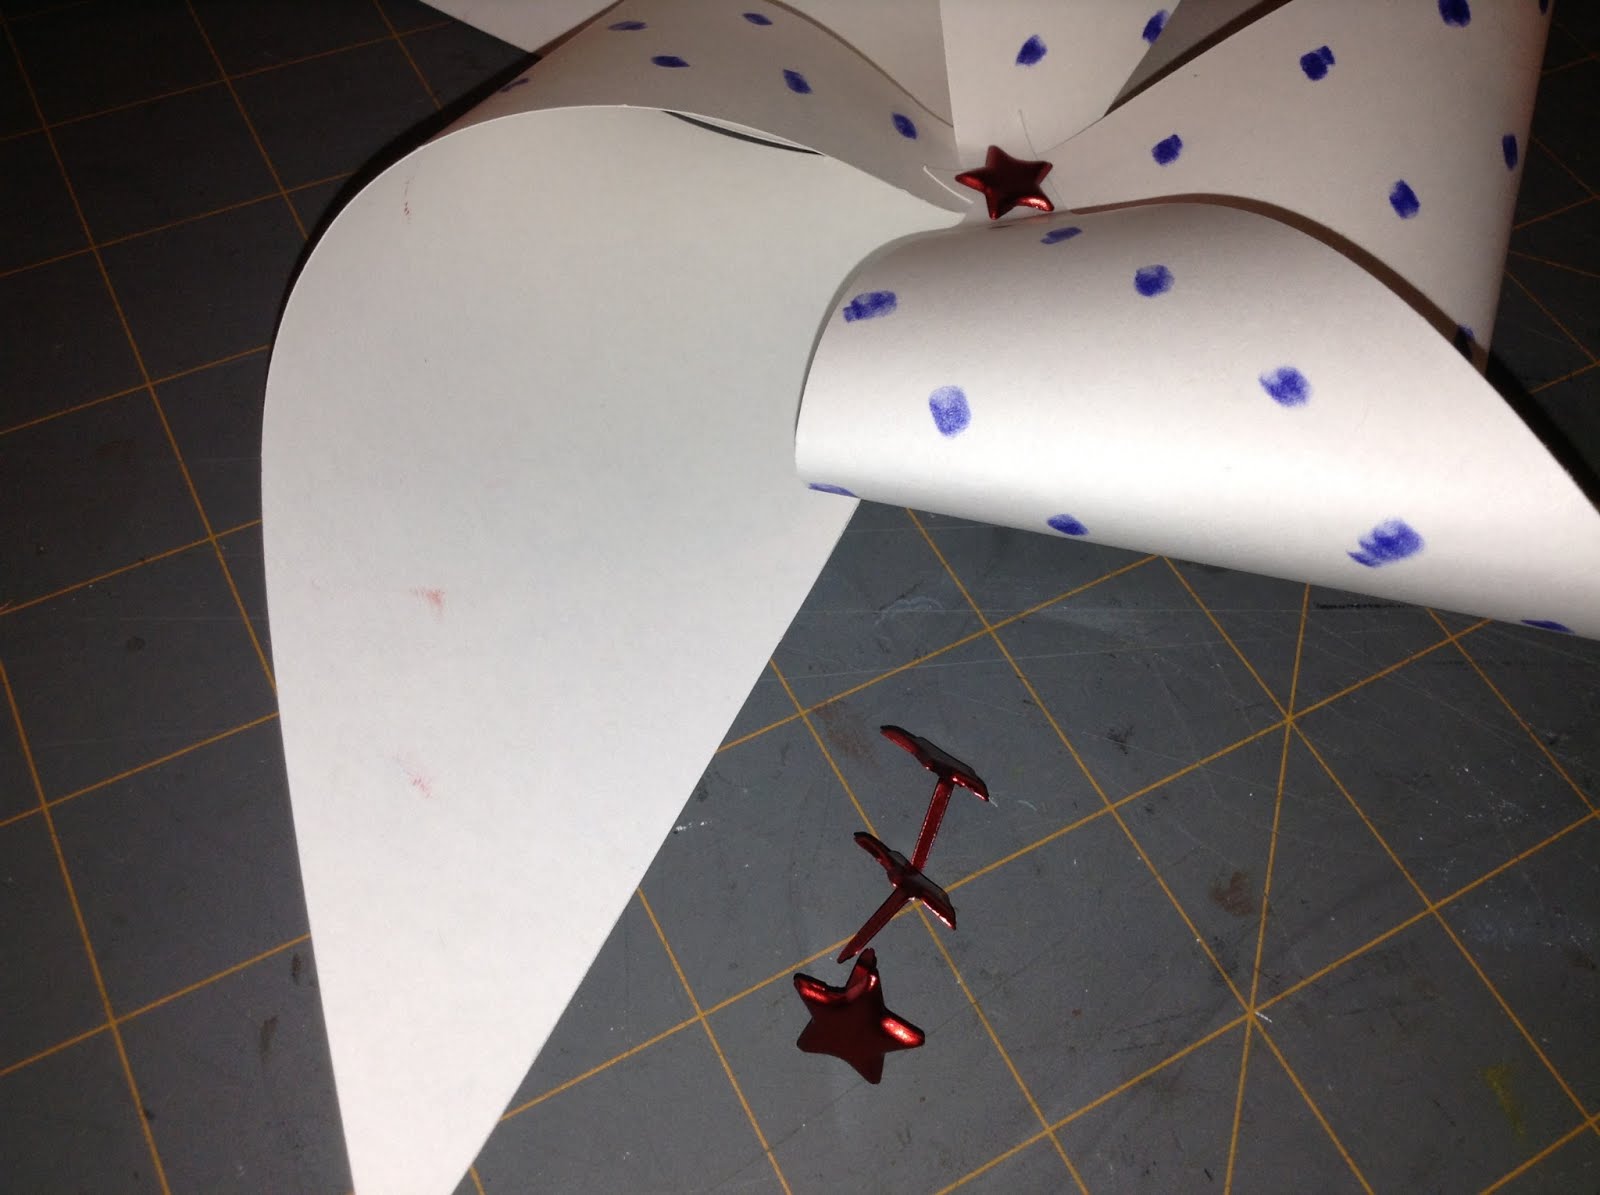
    6. Now comes the awesome part! Watching the pinwheel form! Take the ends of the paper where a hole is punched and bring them toward the center. Use a brad (I happened to find some red star shaped ones, but any old office one will do), and put the it through each one of the holes, including the one in the center. Do you see it? It’s your pinwheel! Pull the brad completely through and fasten it securely on the back. 


    7. Finally, fasten your rod-shaped item to the back (whether it be a straw or wooden rod! :) ) with tape. If you want your pinwheel to actually spin, you’ll have to go the process of finding a rotating wheel and applying it.... but really they are perfect for some festive decoration just like this! :)


    And there you have it! Your pinwheels! Aren’t they cute? And so festive too! One more thing I wanted to mention was to check out this awesome tutorial about making paper plates into bowls! It’s super easy and perfect for keeping your firework-watching snacks in! You can find the link here: http://www.saifou.com/entry/12578.html


    So have a happy Fourth of July! Enjoy the day celebrating freedom, and admiring your awesome new red, white, and blue decorations!

    Saturday, May 11, 2013

    Daisy Head Floral Headband


     Has the Spring season got you trippin' over your toes in flowers? Want to try out the trend that's got everyone pretty in petals?  Here's how you can make your own happy little floral headband!


    What You Need:
    • Scissors
    • Floral tape (found at Walmart and craft stores)
    • A beautiful bouquet (I recommend a Dollar Store for this one)


    What To Do:
    1. Cut off each stem a couple inches from the actual bud. Make sure you don't cut off more than you need; you can use the remainder of the bouquet in a vase to light up a desk or table.
    2. Take each snippet and wrap the stems together, securing with floral tape. Do this until you have a band that will comfortably fit on your head. 
    3. If you don't secure the tape tightly enough, some of the pieces may try to bop off. Adding more floral tape to problem areas can fix this issue.


    4. Wear on a picnic, nature walk, or garden show. This headband is sure to bring happiness wherever it goes (and maybe a couple butterflies too)!


              P.S.- Ignore the timestamp. It lies. ;)


    Tuesday, February 12, 2013

    Sew Sweet Valetines

    Tired of plain Jane paper valentines? Try adding some sweet bows and stitches to mundane messages!

    You Will Need:
    • Yarn (pink and red work well)
    • Scissors
    • Scrapbooking paper
    • Construction Paper
    • A sharp tool for poking holes

    What To Do:

    1.  Cut a piece of scrapbooking paper 8"to 4" for a larger envelope or 5 1/2" to 2 1/2" for a smaller envelope.
    2.  Fold 1/3 of the paper over the other 2/3 to create an envelope
    3.With your sharp poky tool, poke 6 holes along each length of the paper on the decorated side on the 2/3s part of the paper.
    4. Poke 3 holes on the folded up flap in the shape of an upside-down triangle, and another hole in the flap that will close the envelope.
    5. Tie a knot in the end of a piece of yarn, and thread it in and out of the holes up one side until you get to the hole that makes up the middle point of the triangle, thread the yarn through the hole in the top flap, and cut off the yarn, leaving enough to tie a bow with. Repeat this process on the other side of the envelope (see below image for assistance).
    5. Write a note to stick inside, tie the yarn into a bow, and send to your secret valentine!

    Friday, December 14, 2012

    Cool Crafts 4 Your Room!


    Wrapping Paper Light Switch
     
     
    Measure the length and width of your light switch cover and the actual switch, then trace the dimensions on the back of some wrapping paper. Cut them out, then take some double- sided tape and attach it to your light switch cover. Absolutely Fabulous!


    Cool Crafts
    4 
    Your Room


    Wrapping Paper Picture Board                       
     Take a 10'' by 10'' piece of wrapping paper, fold over an 8'' by 8'' piece of cardboard, patterned side up, and tape sides down. Use stickers to attach pictures to the board, or make your own out of paper and put double-sided tape on them.


       -December 2011 issue, page 6


    Thursday, July 19, 2012

    New! in Coral Reef Crafts...

    New in Coral Reef Crafts- Rice Krispies Treats box gets a new lease on life! How to make your own and what to put in it

    Saturday, June 30, 2012

    Get Set...

                   
    And we're back, with another project from Coral Reef Crafts. This patriotic bouquet will show your love and loyalty for the land of the free with tissue paper, flags, and ribbons!
    P.S. The answer is 1776!

    Saturday, May 5, 2012

    Mother's Day Mania

    So, we've got big plans for Mother's Day- crafts, gift ideas, crafts for gift ideas- that will make any mother smile. So stay tuned- you don't want to miss it (This year's theme is Sweet Tweets) !

    P.S.- A certain mother of mine (if reading this) should NOT read afore mentioned Mother's Day posts, as it may spoil a certain amount of things. So please. No peeking.

    And if you've decided that you like this blog, don't hesitate to Become a Member!

    Friday, May 4, 2012

    Ligeia Jr. Presents/ Madame BunBun's New Pad

     Ligeia Jr. Presents...

    Leopard Print!!

    This week's fashion includes a leopard-print top belted with a silk black ribbon and a black silk skirt, which is embroidered with white hand-sewn flowers. It is topped with a leopard print flower for the hair (or plastic nub).


    Also... as I promised, here is Sassy's/Madame BunBun's cardboard house.  Half of the roof opens up so that we can see what she's doing, and it has windows that you can see through.


    Thursday, May 3, 2012

    Fly Away Birdies


    Birdhouse is doing well, but I STILL have not seen any birds in there!!! Course, it may be because I put parakeet, cockatiel, and parrot birdseed in there, and the birds visiting it would not be any of the above, but still! How picky can wild birds be?!
    Also shot this beautiful butterfly which I think may be a Painted Lady. Maybe it would like a birdhouse to feed in.